


Hey, everybody welcome to the Image Processing Series
I 'am Sahitya Arya and Today we are going to explore about the some basic fundamentals of image processing and computer vision .
We will discuss about very basic properties like how images are formed and concept of pin hole camera model . which will help us to understand the functionality of the image processing and openCV.
lets get started !..!
In this article we are going to learn :
1. What are  images
2. Image formation
3. Storing images on computers
4. Getting started with OpenCV
5. Gray-scaling
What are images ?
Images are two dimensional representation of the visible light spectrum. Lets first talk about what does two dimensional mean here .On the basis of your daily life you may have a faint idea that image can be a photograph or something that you can see on your laptop screen or computer screen .
Yes ! ! those are all two dimensional plane where it is only x and y dimension and x , y dimensions here correspond to different pixel points on computer screen or in the photographs .Each pixel reflects different wavelength of light and that is where we refer to the visible light spectrum.
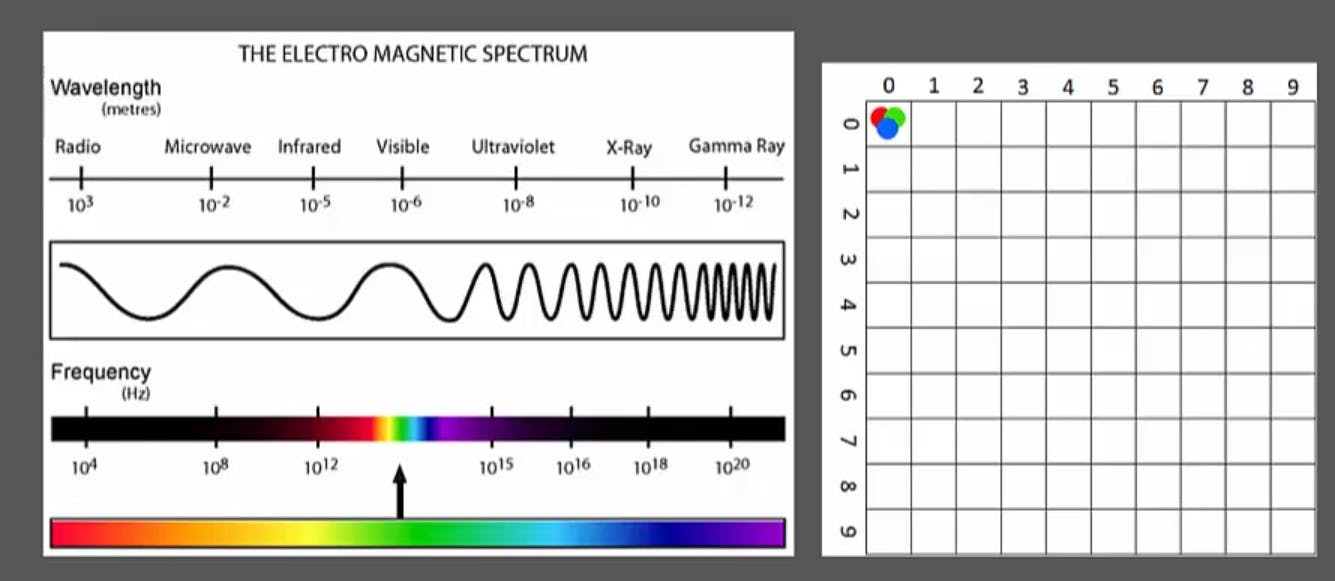
Now the visible light spectrum is part of the electromagnetic spectrum which consist of radio waves all the way to gamma rays and different waves here have different wavelengths and the visible part what we see visible because it is visible to eyes consists of different wavelength and each wavelength corresponds to different colours all the way from red green to blue slightly purple .Each points corresponds to a different colour which means that reflects different wavelength of light that what we see in the images.
How images are formed ?
 Let us take a basic example of image formation onto a piece of film.let us consider a film which is hanging in the air and its facing toward tree. as shown in above figure.so light reflects off an tree at different points and bounces off a tree onto pieces of film but top and the middle of the tree reflect at similar points all along the film and that's not good.basically it will result an unfocused image or blurred image. but our modern cameras give us fine and clear image.
So,
lets understand how does camera works :
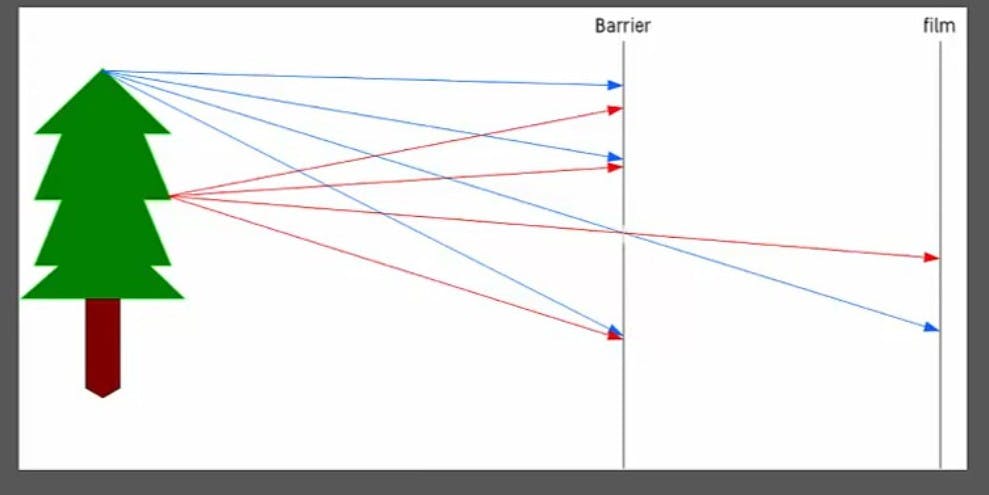 Above image is the perfect example how our camera works. we essentially use a barrier to block off most points of light while leaving a small gap in the barrier this gap is called aperture and disclose some points of light to be reflected onto some film . this system is called as the pinhole camera model and give a much more focus image .In this model aperture always fixed .so only constant amount of light is always entering this hall which can be sometimes overpowering for the film results as everything is going to look white and if image is form then it will be blur.
 Here we use lens which controls the size of aperture and amount of light allowed through it. By focusing the light on a single point we can get a clean and refine image. In modern cameras an adaptive lens is used.which allows us to instead of moving the film back and forth we can actually use the lens to focused directly on the point.
this result in very nicely controlled system.
Here we use lens which controls the size of aperture and amount of light allowed through it. By focusing the light on a single point we can get a clean and refine image. In modern cameras an adaptive lens is used.which allows us to instead of moving the film back and forth we can actually use the lens to focused directly on the point.
this result in very nicely controlled system.
How do computers store images ?
Image in computers can be stored in many ways however we are going to look into the default method which is (RGB) .
RGB stands for red ,green ,Blue.
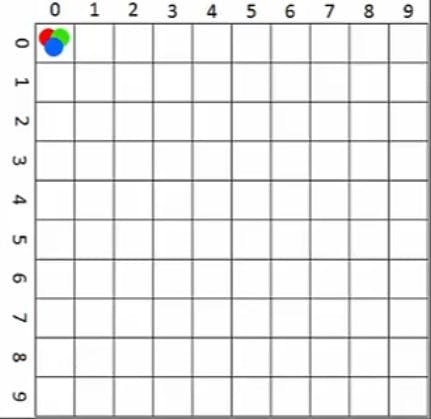 let us consider a 10x10 gird as shown in figure .this figure represents an image and each pixel point which is the cells present in the this grid have three values one for red ,one for green, one for Blue.
OpenCV stored these values as an integer and 8 bits allow to go from 0-255 and give 256 values. here white colour is represented by the 255 in each colour (Red,Green,Blue) so the main Question is how do we make colours like brown,yellow.we know that in kindergarten we have mixed many different colours to form a new colour .for example if we mix red and green then it will form yellow colour .we can also do this in openCV. By mixing different intensities of each colour give us the full colour spectrum of new colour.
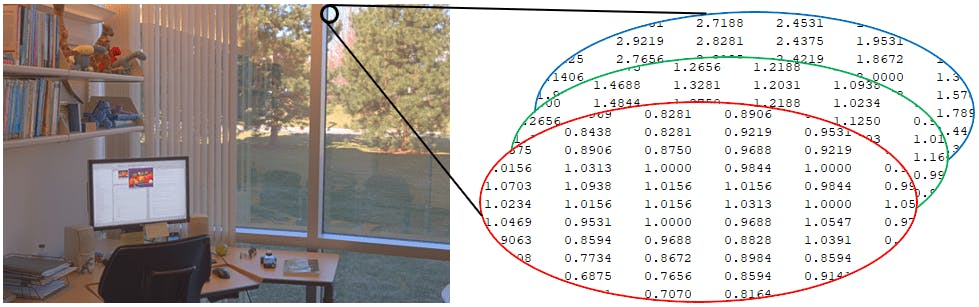
As we can see that this data can be easily stored in array.Yes you are right ! ! ! . thats how opencv stored images in the form of d-dimensional array or matrix
Before move further let us talk about the Black and white or gray-scale images.these images are actually simpler.
There are two types of black and white  images :

1. Gray scale images

2. Binary images
- Lets us discuss Gray scale images :
These do have 2 dimension. In fact they are just stored in a two dimensional array.Darker color are represented by the lower values whereas white being represented by higher values.
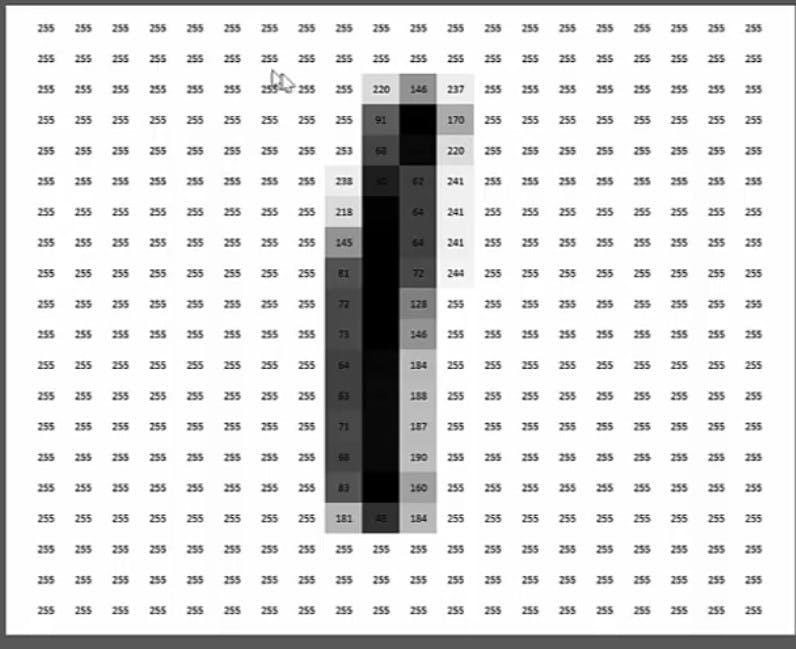 So now we have a full spectrum of gray for an image.
lets talk about Binary images .Binary images can also be called as the black and white images however they are just have two values . pixels in binary images have only two possible intensity values.Numerically two values are often 0 for black and either 1 or 255 for white
So now we have a full spectrum of gray for an image.
lets talk about Binary images .Binary images can also be called as the black and white images however they are just have two values . pixels in binary images have only two possible intensity values.Numerically two values are often 0 for black and either 1 or 255 for white
Getting started with using open OpenCV in python :
First we are going to explore some basic operation like reading and displaying images with openCV
How to read and display an image ?
#importing the required libraries
import cv2
import numpy as np
What is cv2 and Numpy ?
cv2 is module import name for openCV . it is the second version of openCV and first version is called cv1 Numpy is python library used for working with the arrays and matrixes. we don't necessarily need to import numpy .but it is always a good habit.beacuse you never know when you actually need to use it
first we have to load an image using the inbuilt function called as imread
Syntax:
cv2.imread("./images/input.jpg' ")
Parameters:
- imread function takes the path of the image directory as parameter where image has been stored
Example:
img = cv2.imread('./images/input.jpg')
Now our image file 'input .jpg' is loaded and stored in variable named as img in the form of numpy array
we can display an image using inbuilt function called as imshow
Syntax:
cv2.imshow(name,img)
Parameters:
name=this parameter is title shown on image window it should be a string
image=this parameter is a numpy variable in which my image is stored using imread function
Example:
cv2.imshow("Hello world",img)
let us see the complete code:
import cv2

# Load an image using 'imread' specifying the path to image
img = cv2.imread('./images/input.jpg')

# Our file 'input.jpg' is now loaded
# as a varaible we named  img

# To display our image variable, we use 'imshow'
cv2.imshow('Hello World', img)

cv2.waitKey():
# Failure to place this will cause your program to hang
cv2.destroyAllWindows()
waitKey () :
waitkey function allow us to input information when a image window is open it takes some parameters but by leaving it blank means it just waits for any key to be pressed before continuing .By placing number (except 0) we can specify a delay time for how long you want to keep the window open ( time is in millisecond here).
destroyAllWindows():
This inbuilt function close all the open windows .if we do not place this function this will cause your program to hang. this function have many variants . we can close a specific window also using destr oyWindow() .this function takes the name of the window as parameter.
Gray-scaling :
Gray-scaling is a process by which an image converted into shades of grey(black and white) from full color image or other color spaces There are many inbuilt function present in OpenCV which can be used to convert image into greyscale images before processing . Gray-scaling process is used to simplifies the image . it is also acting as noise reduction and increase the processing time as their is less information left in the image. To convert image into grayscale image we can use an inbuilt openCV function called as cvtColor
cvtColor():
cv2.cvtColor() method is used to convert an image from one color space to another. There are more than 150 color-space conversion methods available in OpenCV
Syntax:
cv2.cvtColor(img,cv2.COLOR_BGR2GRAY)
Parameters:
img = this parameter is a variable in which image is loaded as numpy array by the imread function
cv2.COLOR_BGR2GRAY = this parameter is a colorspace present in openCV used to convert images into gray-scale
Let us see complete Code:
# Load our input image
image = cv2.imread('./images/input.jpg')
cv2.imshow('Original', image)
cv2.waitKey()

# We use cvtColor, to convert to grayscale
gray_image = cv2.cvtColor(image, cv2.COLOR_BGR2GRAY)

cv2.imshow('Grayscale', gray_image)
cv2.waitKey()
!! there is a short method also present to convert image into grayscale image in which we do not need to use this cvt.Color() function.we can directly change image into gray scale when we are reading an image.
! let us try this method ....
img = cv2.imread('./images/input.jpg',0)
Let us see complete code for this method :
#Another method faster method
img = cv2.imread('./images/input.jpg',0)

cv2.imshow('Grayscale', img)
cv2.waitKey()
cv2.destroyAllWindows()
Hurray ! ! !
you have completed your first step in the field of the Computer vision and image processing. Today you have learned some basic concept of computer vision like
pin hole camera model ,image formation,how computer store an image ,reading,displaying and how we can convert an image into grayscale image.
if you think this article help you ,share it ! ! !